A stripped gear in your patio umbrella crank mechanism can be a frustrating issue, rendering your umbrella difficult or impossible to open and close. Fortunately, many common crank mechanisms can be repaired with a few basic tools and replacement parts, saving you the cost of a new umbrella. The repair process typically involves disassembling the crank housing, replacing the damaged gear, and reassembling the unit, a task that can often be completed in under an hour.
Identifying a Stripped Crank Gear
Before attempting a repair, it’s crucial to confirm that a stripped gear is indeed the problem. Common symptoms include the crank handle spinning freely without moving the umbrella canopy, or the umbrella getting stuck in a partially open or closed position. You might also hear grinding noises when attempting to operate the crank. To verify, carefully inspect the crank housing for any visible damage or loose components. In many cases, the gears are made of plastic or a softer metal, making them susceptible to wear and tear over time, especially with frequent use or forceful cranking. For browse all patio umbrellas articles on this site.
Gathering Your Tools and Replacement Parts
For most patio umbrella crank repairs, you’ll need a screwdriver set (Phillips and flathead), a pair of pliers, and potentially a small wrench. The most critical component is the replacement gear. Many umbrella manufacturers offer replacement parts, or you can find universal repair kits online. It’s important to measure the diameter and count the teeth of your existing gear to ensure compatibility. Some common gear types include spur gears and worm gears, so identifying the correct type is essential for a successful repair.
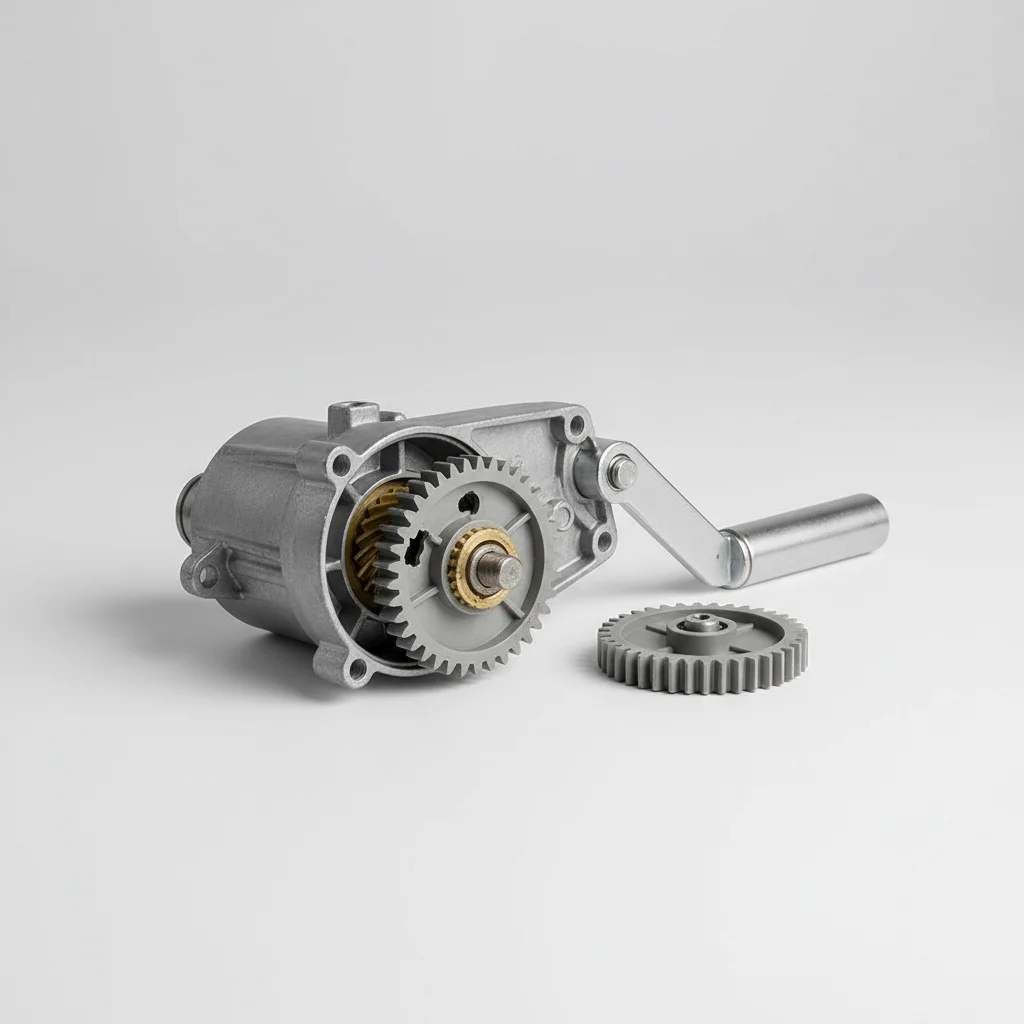
Step-by-Step Gear Replacement Process
|
Our Picks for the Best Patio Umbrella in 2026
As an Amazon Associate I earn from qualifying purchases.
|
||
| Num | Product | Action |
|---|---|---|
| 1 | BACKYARD EXPRESSIONS PATIO · HOME · GARDEN 911554 21 Pound Umbrella Base, Bronze |

|
| 2 | ABCCANOPY 7.5ft Scalloped Patio Umbrella, Outdoor Table Umbrella with Tilt and Crank, Fiberglass Ribs Deck Umbrella for Patio, Pool, Garden, Picnic (Turquoise) |
|
| 3 | JEAREY 9 FT Patio Umbrella Outdoor, Table Umbrellas Market Umbrella w/Push Button Tilt/Crank, 8 Sturdy Ribs(Cerulean) |
|
| 4 | JEAREY 7.5FT Patio Umbrella Outdoor Market Umbrella with 6 Sturdy Ribs, Push Button Tilt/Crank Table Umbrella for Garden, Deck, Backyard and Pool, Royal Blue |
|
| 5 | AreShark 9FT Patio Umbrella with Solar Lights, 32 LED Lighted Pool Umbrella w/Tilt and Crank, Outdoor Market Solar Umbrellas for Garden, Deck, Backyard, Pool and Beach, Light Gray |
|
| 6 | Kingdura 9ft 3-Tier Patio Umbrella, Outdoor Table Umbrella with Easy Crank & Tilt, 8 Reinforced Ribs, UV Protection for Deck, Pool, Market, Backyard (Beige) |
|
| 7 | MASTERCANOPY Patio Umbrella 9 ft Replacement Canopy for 8 Ribs-Burgundy Canopy Only |
|
| 8 | 9FT Auto-Tilt Patio Umbrella|Outdoor Market Table Umbrella with 8 Fiberglass Ribs for Pool,Deck&Backyard |
|
| 9 | ABCCANOPY 9ft Outdoor Umbrella Replacement Top Suit 8 Ribs (Turquoise) |
|
| 10 | 9ft Patio Umbrella with Push Button Tilt and Crank,Outdoor Market Table Umbrella UV Protection 8 Sturdy Ribs for Backyard,Garden,Pool,Deck |
|
Begin by carefully detaching the crank handle. This usually involves unscrewing a cap or a small screw at the center of the handle. Next, locate and remove the screws that secure the crank housing to the umbrella pole. Once the housing is open, you’ll be able to access the internal gears. Take a photo of the existing gear arrangement before removing the stripped gear; this will serve as a helpful reference during reassembly. Gently pry out the damaged gear, being mindful of any washers or spacers. Insert the new gear, ensuring it meshes correctly with the other gears in the mechanism. Reattach any washers or spacers in their original positions.
- Remove the crank handle and housing screws.
- Carefully photograph the existing gear assembly.
- Extract the stripped gear and replace it with the new one.
- Ensure all gears mesh smoothly and freely.
- Reassemble the housing and reattach the crank handle.
Testing and Maintenance Tips
After reassembling the crank mechanism, test its operation by slowly turning the handle. The umbrella should open and close smoothly without any grinding or sticking. If you encounter resistance, recheck the gear alignment. To prolong the life of your repaired crank, consider applying a small amount of silicone-based lubricant to the gears. Avoid using petroleum-based lubricants, as these can attract dirt and degrade plastic components. Regular cleaning and lubrication, especially before and after seasonal storage, can significantly extend the lifespan of your patio umbrella’s crank mechanism.
When to Consider Professional Help or Replacement
While many crank repairs are DIY-friendly, there are instances when professional help or a full replacement might be necessary. If the umbrella pole itself is damaged, the internal cord is frayed beyond repair, or if you cannot find compatible replacement parts, it might be more cost-effective to invest in a new umbrella. Some high-end cantilever umbrellas have more complex internal mechanisms that are best handled by a professional. Always weigh the cost of parts and your time against the price of a new, reliable umbrella.
Get our weekly buyer guide
Practical specs, not advice. Unsubscribe anytime.