Re-stringing a broken crank patio umbrella is a common and straightforward DIY task that can restore full functionality and extend the life of your outdoor shade solution. This repair typically takes between 30 minutes to 2 hours, requiring basic tools like screwdrivers, pliers, and a replacement cord such as durable nylon rope or 550 paracord. By following a step-by-step process of disassembly, threading, and reassembly, you can easily fix your umbrella at home, saving both time and money compared to purchasing a new one.
Understanding Your Crank Patio Umbrella
Crank patio umbrellas use a simple yet effective mechanism to raise and lower their canopies. At the heart of this system is a string or cord that winds around a spindle inside the umbrella pole, connected to a series of pulleys and a lift hub. When you turn the crank handle, the string pulls the canopy up or lets it down, allowing for easy adjustment of your shade. Over time, exposure to sun, rain, wind, and repeated use can cause this crucial string to fray, weaken, and eventually break. Common culprits include UV degradation, water damage, friction against internal components, or simply the natural wear and tear that comes with years of service. Recognizing these components and their function is the first step toward a successful repair.
What You’ll Need: Tools and Materials
Before you begin, gather the necessary tools and materials to ensure a smooth and efficient repair process. Having everything at hand will prevent interruptions and make the job much easier.
Essential Tools:
- Screwdrivers: Both Phillips head and flathead for disassembling the crank housing.
- Needle-nose Pliers: Crucial for manipulating small parts, bending wires, and securing knots.
- Adjustable Wrench or Socket Set: To loosen and tighten nuts and bolts on the crank mechanism.
- Scissors or Utility Knife: For cutting the old and new cord.
- Lighter or Match: To carefully seal the ends of the new cord, preventing fraying.
- Wire Coat Hanger (straightened): An invaluable tool for guiding the new string through the umbrella pole.
Materials:
- Replacement Umbrella Cord: Opt for durable, weather-resistant material such as nylon rope or 550 paracord. The length will vary by umbrella size, but generally, 15-20 feet is sufficient. Measure your old cord if possible for an accurate length.
Optional (but helpful) Tools:
- Small Flashlight: To see inside the umbrella pole when threading.
- Shop Vacuum and Cotton String: For particularly stubborn threading challenges (detailed in Step 3).
- Marker: To label removed parts if your umbrella has many similar-looking components.
Having these items ready will set you up for success, allowing you to focus on the repair rather than hunting for tools.
Preparing for the Re-Stringing Process
A little preparation goes a long way in making your umbrella repair hassle-free.
- Safety First: Ensure your umbrella is stable. If possible, lay it horizontally on a clean, flat surface like a workbench or sturdy table. This provides better access and prevents the umbrella from tipping over.
- Clear Work Area: Create a clean, well-lit workspace. You’ll be dealing with small parts, and you don’t want to lose them.
- Document the Disassembly: As you disassemble components, especially the crank mechanism, take photos or make notes. This visual guide will be invaluable during reassembly. You might have several screws, washers, and gears; knowing their original order is critical.
- Consider Canopy Removal (Optional but Recommended): While not always strictly necessary, removing the fabric canopy from the umbrella frame can significantly improve access to the internal mechanisms, making threading much easier. To do this, unscrew the finial at the top, untie any fabric ties, and carefully slide the canopy off the ribs.
Once prepared, you’re ready to dive into the re-stringing process.
Step-by-Step Guide to Re-Stringing Your Patio Umbrella
Replacing your patio umbrella string involves several steps, each requiring careful attention. Follow these instructions closely for the best results.
Step 1: Disassemble the Crank Housing
|
Our Picks for the Best Patio Umbrella in 2026
As an Amazon Associate I earn from qualifying purchases.
|
||
| Num | Product | Action |
|---|---|---|
| 1 | BACKYARD EXPRESSIONS PATIO · HOME · GARDEN 911554 21 Pound Umbrella Base, Bronze |

|
| 2 | ABCCANOPY 7.5ft Scalloped Patio Umbrella, Outdoor Table Umbrella with Tilt and Crank, Fiberglass Ribs Deck Umbrella for Patio, Pool, Garden, Picnic (Turquoise) |
|
| 3 | JEAREY 7.5FT Patio Umbrella Outdoor Market Umbrella with 6 Sturdy Ribs, Push Button Tilt/Crank Table Umbrella for Garden, Deck, Backyard and Pool, Royal Blue |
|
| 4 | MASTERCANOPY Patio Umbrella 9 ft Replacement Canopy for 8 Ribs-Burgundy Canopy Only |
|
| 5 | JEAREY 9 FT Patio Umbrella Outdoor, Table Umbrellas Market Umbrella w/Push Button Tilt/Crank, 8 Sturdy Ribs(Cerulean) |
|
| 6 | ABCCANOPY 9ft Outdoor Umbrella Replacement Top Suit 8 Ribs (Turquoise) |
|
| 7 | Kingdura 9ft 3-Tier Patio Umbrella, Outdoor Table Umbrella with Easy Crank & Tilt, 8 Reinforced Ribs, UV Protection for Deck, Pool, Market, Backyard (Beige) |
|
| 8 | 9FT Auto-Tilt Patio Umbrella|Outdoor Market Table Umbrella with 8 Fiberglass Ribs for Pool,Deck&Backyard |
|
| 9 | 9ft Patio Umbrella with Push Button Tilt and Crank,Outdoor Market Table Umbrella UV Protection 8 Sturdy Ribs for Backyard,Garden,Pool,Deck |
|
| 10 | AreShark 9FT Patio Umbrella with Solar Lights, 32 LED Lighted Pool Umbrella w/Tilt and Crank, Outdoor Market Solar Umbrellas for Garden, Deck, Backyard, Pool and Beach, Light Gray |
|
The first task is to access the broken string by carefully disassembling the crank mechanism.
- Locate the Crank Housing: This is typically a plastic or metal casing at the base of the umbrella pole where the crank handle is attached.
- Remove Screws: Use your Phillips or flathead screwdriver to remove the screws holding the crank housing together. There are usually 2 to 4 screws. Set them aside in a safe place.
- Detach Components: Gently pry open the housing. Inside, you’ll find gears, a washer, a nut, and sometimes a cotter pin. Carefully remove these components, noting their order. It’s highly recommended to take a picture at this stage to remember the exact arrangement. The crank handle itself should now be detachable from the pole.
- Remove Old String Remnants: Once the housing is open, you should see where the old string was connected to the crank axle or handle. Untie or cut any remaining pieces of the old string from this point.
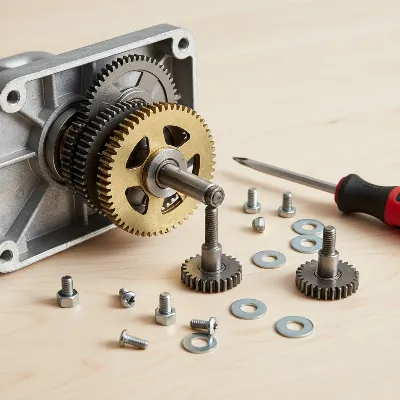 Disassembled patio umbrella crank housing showing internal gears, nuts, and screws with a screwdriver nearby.
Step 2: Remove the Old String
Now that the crank housing is open, you can remove the rest of the broken string.
- Locate Old String Ends: Identify where the old string passes into the umbrella pole and where it might be connected to the upper lift hub.
- Pull Out Remaining String: Carefully pull out any visible pieces of the old string. If it’s broken internally, you may only be able to pull out small sections from either end. Ensure no frayed pieces are left inside the pole, as they could obstruct the new string.
- Clean the Pole (Optional): If there’s any debris or rust inside the pole that could hinder the new string, try to clean it out with a thin brush or compressed air.
Step 3: Thread the New String Through the Pole
This is often the trickiest part, as the string needs to pass through the hollow umbrella pole, navigating internal structures and pulleys.
- Prepare the New Cord: Cut your new replacement cord to the appropriate length (typically 15-20 feet, depending on umbrella size). To prevent fraying and make threading easier, carefully melt and pinch one end of the cord with a lighter to create a stiff, pointed tip.
- Method 1: Wire Hanger Guide:
- Straighten a wire coat hanger and bend one end into a small hook.
- Securely attach the melted end of your new cord to this hook, crimping it tightly with needle-nose pliers.
- From the top opening of the umbrella pole (where the canopy connects, or where the old string exited upwards), feed the hanger with the new string attached down through the pole.
- Guide the hanger until you can see or feel it near the crank mechanism opening at the bottom of the pole. Use your flashlight to help.
- Once visible, use needle-nose pliers to grab the hooked end of the hanger and pull it out, bringing the string with it.
- Detach the string from the hanger.
- Method 2: Shop Vac and Cotton String (for stubborn cases):
- If the wire hanger method proves difficult, try this alternative. Take a very lightweight string (like cotton thread) and tie a small, light object (like a small nut or a piece of crumpled paper) to one end.
- Drop this string from the top of the umbrella pole.
- At the bottom opening of the pole (near the crank), place the nozzle of your shop vacuum and turn it on. The suction should pull the lightweight string down and out through the bottom.
- Once the cotton string is through, securely tie one end of your new, heavier umbrella cord to it.
- Go back to the top of the umbrella pole and gently pull the cotton string upwards, drawing the new umbrella cord through the pole.
Ensure the string is routed cleanly and isn’t snagged inside the pole.
Step 4: Route Through Pulleys and Crank Mechanism
With the new string successfully threaded through the main pole, it’s time to connect it to the crank mechanism and pulleys.
- Feed Through Crank Axle: Take the end of the string emerging from the bottom of the pole and thread it through the small hole in the center of the crank axle (the rotating part the handle attaches to).
- Tie a Secure Knot: Tie a tight double knot at the end of the string around the crank axle. This knot will secure the string to the winding mechanism, preventing it from pulling back through. Ensure the knot is compact enough not to interfere with the crank’s rotation.
- Position Crank Assembly: Before reassembling the housing, make sure all gears, washers, and nuts are correctly placed around the crank axle as you documented in Step 1.
Step 5: Secure to the Lift Hub/Yoke
The other end of the string needs to connect to the part that raises and lowers the canopy.
- Route to Top Pulley: Take the long end of the string emerging from the top of the umbrella pole. Feed it over the main pulley wheel located near the top of the pole, just below where the canopy ribs attach.
- Guide to Lift Hub/Yoke: The string will then run down the exterior of the pole (or sometimes through a channel) to the lift hub or yoke—the component that slides up and down the pole to expand or retract the canopy.
- Thread Through Lift Hub: Pass the end of the string through the designated hole or loop on the lift hub/yoke.
- Tie a Final Knot: Tie another secure double knot at this end of the string, ensuring it is firmly attached to the lift hub. Trim any excess string. This knot is critical for the umbrella’s lifting function.
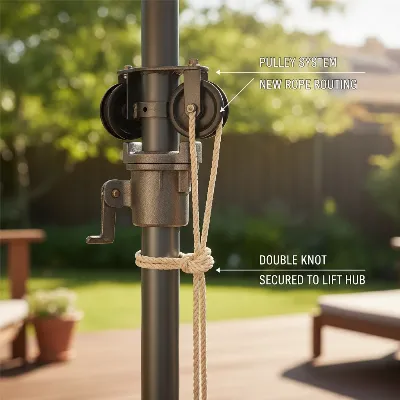 Patio umbrella string routed through a pulley system and tied with a secure knot at the lift hub.
Step 6: Reassemble and Test
The final step is to put everything back together and ensure your repair is successful.
- Reassemble Crank Housing: Carefully place the crank handle back into position. Reattach the crank housing halves, ensuring all gears are properly aligned. Insert and tighten the screws you removed in Step 1. Caution: Do not overtighten these screws, as this can damage the plastic housing or impede the crank’s movement. Hand-tighten is usually sufficient.
- Test Operation: Gently turn the crank handle. The umbrella canopy should begin to raise or lower smoothly.
- Adjust Tension (if necessary): If the umbrella feels stiff or too loose, you may need to slightly adjust the string length at either the crank axle or the lift hub. This typically involves untying, adjusting, and retying the knot.
- Reattach Canopy (if removed): If you removed the fabric canopy, slide it back onto the frame, securing it with the finial and any ties.
After these steps, your patio umbrella should be fully functional, ready to provide shade for many seasons to come.
Troubleshooting Common Issues
Even with careful execution, you might encounter a few snags. Here’s how to address them:
- String Not Moving Smoothly: This often indicates friction or a snag inside the pole. Disassemble the crank housing again and inspect the string’s path. Ensure no excess string is bunched up, and the cord isn’t rubbing against any internal edges. The vacuum method (Step 3) can help clear internal obstructions.
- Crank Handle Not Engaging/Turning: Check the crank mechanism’s assembly. Make sure all gears are aligned correctly and that nuts and bolts aren’t overtightened. A small amount of silicone lubricant on the gears can also help.
- Knots Slipping: If your umbrella raises but then slides down, your knots might not be secure enough. Ensure you’re using strong double knots (like a figure-eight stopper knot or a fisherman’s bend) and that the cord material is suitable for holding knots firmly.
- Umbrella Won’t Stay Open: This could be a string tension issue or a problem with the internal locking mechanism that holds the umbrella open. Ensure the string is taut when the umbrella is fully extended.
> “Re-stringing a patio umbrella might seem daunting, but it’s a prime example of how basic home repair skills can extend the life of your outdoor essentials. The key is patience and paying close attention to the order of operations during disassembly and reassembly.” – Johnathan Reed, Master Technician at Outdoor Living Solutions
Maintaining Your Patio Umbrella String
Once you’ve successfully re-strung your patio umbrella, a little preventative maintenance can help prolong the life of your new cord and prevent future repairs.
- Regular Inspection: Periodically check the string for signs of wear, fraying, or thinning, especially where it passes over pulleys or through the crank mechanism. Early detection allows for timely replacement before a complete break.
- Keep it Clean: Dust, dirt, and debris can accumulate in the crank mechanism and inside the pole, creating friction that wears down the string. Occasionally clean the visible parts of the mechanism.
- Lubricate Moving Parts: Apply a silicone-based spray lubricant to the gears and internal moving parts of the crank mechanism once a year. This reduces friction and ensures smooth operation.
- Proper Storage: During the off-season or extended periods of non-use, consider closing your umbrella and securing it with a cover. If possible, store it indoors or in a sheltered location to protect it from extreme weather, especially prolonged UV exposure and freezing temperatures, which can degrade the cord and other components.
- Avoid Over-Cranking: Always crank gently until the canopy is fully open or closed. Forcing the crank or overtightening can put undue stress on the string and internal gears.
By following these simple maintenance tips, you can ensure your re-strung patio umbrella remains a reliable source of shade for many years.
Conclusion
A broken string doesn’t have to mean the end for your beloved patio umbrella. As we’ve explored, re-stringing a crank patio umbrella is a practical and rewarding DIY project that empowers you to extend the life of your outdoor furniture. By carefully disassembling the crank housing, effectively guiding the new cord through the pole and pulley system, securing it with strong knots, and reassembling the components, you can restore your umbrella’s full functionality. This hands-on repair not only saves you the cost of a new umbrella but also gives you a deeper understanding of how your outdoor gear works. With regular maintenance, your newly re-strung patio umbrella will continue to provide shade and comfort for countless sunny days. So, why not give it a try and transform a broken umbrella into a renewed centerpiece of your outdoor living space?
Frequently Asked Questions
What kind of string should I use for a patio umbrella?
For optimal durability and weather resistance, it is best to use a strong, rot-resistant cord like nylon rope or 550 paracord. These materials can withstand outdoor elements, including UV exposure and moisture, much better than standard ropes, ensuring a longer lifespan for your repaired umbrella string.
How long does it take to restring a patio umbrella?
The time required to restring a patio umbrella can vary depending on your experience and the specific umbrella model, but typically it takes between 30 minutes to 2 hours. The most time-consuming part is often guiding the new string through the internal pole, which can be made easier with tools like a straightened wire hanger or a shop vacuum.
Can all crank patio umbrellas be re-strung?
Most standard crank patio umbrellas can be re-strung, especially if the crank mechanism itself is still functional. However, some very old or cheaply made models might have internal designs that make string replacement exceedingly difficult or have components that are not meant to be disassembled. Always check for visible screws and access points before starting.
What if my crank mechanism is broken, not just the string?
If the crank mechanism (gears, handle) is broken, simply replacing the string won’t solve the problem. You might need to purchase a replacement crank assembly, which some umbrella manufacturers offer. Replacing the entire crank unit is often a more complex task that might require specific parts for your umbrella model.
How often should I check my umbrella string for wear?
It is advisable to inspect your patio umbrella string at least once a year, preferably at the beginning of the outdoor season. Look for signs of fraying, discoloration, or general thinning, especially near the pulleys and where the string attaches to the crank and lift hub. Regular checks can help you replace the string proactively before it completely breaks.
Frequently Asked Questions
What kind of string should I use for a patio umbrella?
For optimal durability and weather resistance, use a strong, rot-resistant cord like nylon rope or 550 paracord. These materials withstand outdoor elements, including UV exposure and moisture, much better than standard ropes, ensuring a longer lifespan for your repaired umbrella string.
How long does it take to restring a patio umbrella?
The time required to restring a patio umbrella typically takes between 30 minutes to 2 hours, depending on your experience and the specific umbrella model. The most time-consuming part is often guiding the new string through the internal pole, which can be made easier with tools like a straightened wire hanger or a shop vacuum.
Can all crank patio umbrellas be re-strung?
Most standard crank patio umbrellas can be re-strung, especially if the crank mechanism itself is still functional. However, some very old or cheaply made models might have internal designs that make string replacement exceedingly difficult or have components not meant to be disassembled. Always check for visible screws and access points before starting.
What if my crank mechanism is broken, not just the string?
If the crank mechanism (gears, handle) is broken, simply replacing the string won't solve the problem. You might need to purchase a replacement crank assembly, which some umbrella manufacturers offer. Replacing the entire crank unit is often a more complex task that might require specific parts for your umbrella model.
How often should I check my umbrella string for wear?
It is advisable to inspect your patio umbrella string at least once a year, preferably at the beginning of the outdoor season. Look for signs of fraying, discoloration, or general thinning, especially near the pulleys and where the string attaches to the crank and lift hub. Regular checks can help you replace the string proactively before it completely breaks.
How to Re-String a Crank Patio Umbrella
Learn how to replace a broken string in your crank patio umbrella with this step-by-step guide, restoring its functionality and extending its life.
Carefully remove the screws holding the crank housing together using Phillips or flathead screwdrivers. Gently detach internal components like gears, washers, and nuts, noting their order with photos. Remove any remnants of the old string from the crank axle.
Locate the ends of the old string passing into the umbrella pole and connected to the upper lift hub. Pull out any visible pieces of the old string, ensuring no frayed sections remain inside the pole. Optionally, clean the pole of any debris or rust.
Cut 15-20 feet of new nylon rope or 550 paracord and melt one end to create a stiff tip. Use a straightened wire coat hanger to guide the new string from the top of the pole down to the crank mechanism opening. Alternatively, use a shop vacuum to pull a lightweight string through, then attach and pull the new cord.
Feed the string emerging from the bottom of the pole through the small hole in the crank axle and tie a secure double knot. Ensure all gears, washers, and nuts are correctly positioned around the crank axle before reassembly.
Route the long end of the string from the top of the pole over the main pulley wheel and guide it down to the lift hub/yoke. Pass the string through the designated hole or loop on the lift hub and tie another secure double knot, trimming any excess string.
Get our weekly buyer guide
Practical specs, not advice. Unsubscribe anytime.
The guide was mostly good, especially the part about understanding the crank system. However, I found the reassembly a little tricky to visualize from the text alone. A few more close-up photos of the pulleys and lift hub during reassembly would have made it a 5-star experience. Still, I got it done eventually.
This was a lifesaver! My old nylon rope snapped, and I thought my umbrella was toast. It took me about an hour and a half, mostly because I was a bit slow with the disassembly part. The tips on using basic tools like screwdrivers and pliers were really helpful. Definitely recommend trying this before tossing your umbrella.
I was so close to buying a new umbrella because the crank mechanism broke, but then I found this guide. The step-by-step instructions for threading the new cord were super clear. I used some 550 paracord I had lying around, and it worked perfectly. My umbrella is good as new, and I saved a ton of money!
I’m not usually one for DIY, but my favorite patio umbrella was useless with a broken string. This made the whole process of replacing the cord so much less intimidating. It really did only take me about an hour, just like it said. It’s great to have my shade back for summer!