A beautiful patio umbrella enhances any outdoor space, providing shade and style. However, even the most robust umbrellas can suffer damage, and a snapped rib is a common culprit. Don’t let a broken rib relegate your favorite umbrella to the scrap heap just yet. With a few basic tools and a bit of patience, you can often perform a successful DIY repair, extending the life of your umbrella and saving you the cost of a full replacement. This comprehensive guide will walk you through everything you need to know to mend that broken rib and get your patio paradise back in perfect shade.
Understanding Your Patio Umbrella’s Ribs
Patio umbrella ribs are the structural components that extend from the central pole to the edge of the canopy, providing its shape and support. Knowing their material and why they might break is the first step toward a successful repair.
Most patio umbrella ribs are made from one of three primary materials:
- Wood: Often found in classic or traditional designs, wooden ribs can offer a charming aesthetic. They are typically made from hardwoods like eucalyptus or teak. While sturdy, wood can splinter or snap cleanly under stress or due to rot if not properly maintained.
- Fiberglass: Increasingly popular for its flexibility and durability, fiberglass ribs are designed to bend and flex with the wind, making them less prone to snapping than other materials. However, extreme force can still cause them to fracture or splinter.
- Aluminum: Lightweight and corrosion-resistant, aluminum ribs are common in many modern umbrellas. They are strong but can bend or buckle under high stress, and a sharp impact can cause them to snap.
Ribs commonly snap due to several factors. High winds are a major culprit, catching the umbrella and twisting or overextending the ribs. Improper closing or securing, accidental impacts, or material fatigue over time can also lead to breaks.
Assessing the Damage and Preparing for Repair
Before diving into the repair, it’s crucial to carefully assess the damage and gather all necessary tools and materials. The type of break and the rib material will dictate your approach. Inspect the rib for a clean snap, a splintered break, or a significant bend. Note if the break is near the hub (where ribs attach to the pole) or closer to the canopy edge.
Tools You’ll Need
The specific tools will vary slightly based on the rib material, but a general toolkit should include:
- Drill and drill bits (appropriate for wood or metal)
- Screwdriver (Phillips and flathead)
- Utility knife or saw
- Sandpaper (various grits)
- Wood clamps
- Measuring tape
- Pencil
- Safety glasses and gloves
|
Our Picks for the Best Patio Umbrella in 2026
As an Amazon Associate I earn from qualifying purchases.
|
||
| Num | Product | Action |
|---|---|---|
| 1 | BACKYARD EXPRESSIONS PATIO · HOME · GARDEN 911554 21 Pound Umbrella Base, Bronze |

|
| 2 | JEAREY 9 FT Patio Umbrella Outdoor, Table Umbrellas Market Umbrella w/Push Button Tilt/Crank, 8 Sturdy Ribs(Cerulean) |
|
| 3 | JEAREY 7.5FT Patio Umbrella Outdoor Market Umbrella with 6 Sturdy Ribs, Push Button Tilt/Crank Table Umbrella for Garden, Deck, Backyard and Pool, Royal Blue |
|
| 4 | ABCCANOPY 7.5ft Scalloped Patio Umbrella, Outdoor Table Umbrella with Tilt and Crank, Fiberglass Ribs Deck Umbrella for Patio, Pool, Garden, Picnic (Turquoise) |
|
| 5 | 9FT Auto-Tilt Patio Umbrella|Outdoor Market Table Umbrella with 8 Fiberglass Ribs for Pool,Deck&Backyard |
|
| 6 | Kingdura 9ft 3-Tier Patio Umbrella, Outdoor Table Umbrella with Easy Crank & Tilt, 8 Reinforced Ribs, UV Protection for Deck, Pool, Market, Backyard (Beige) |
|
| 7 | MASTERCANOPY Patio Umbrella 9 ft Replacement Canopy for 8 Ribs-Burgundy Canopy Only |
|
| 8 | 9ft Patio Umbrella with Push Button Tilt and Crank,Outdoor Market Table Umbrella UV Protection 8 Sturdy Ribs for Backyard,Garden,Pool,Deck |
|
| 9 | ABCCANOPY 9ft Outdoor Umbrella Replacement Top Suit 8 Ribs (Turquoise) |
|
| 10 | AreShark 9FT Patio Umbrella with Solar Lights, 32 LED Lighted Pool Umbrella w/Tilt and Crank, Outdoor Market Solar Umbrellas for Garden, Deck, Backyard, Pool and Beach, Light Gray |
|
Materials for the Job
Your choice of materials will depend directly on the type of rib you are repairing:
-
For Wooden Ribs:
- Wood glue (waterproof exterior grade)
- Small wood screws or bolts (stainless steel recommended)
- A piece of matching wood for a splice, or a metal mending plate/sleeve
- Wood filler (optional, for aesthetics)
- Wood stain or paint (to match existing finish)
-
For Fiberglass Ribs:
- Fiberglass repair kit (resin, hardener, fiberglass cloth/tape)
- Epoxy adhesive (strong, waterproof)
- A small piece of metal tubing or solid rod (slightly smaller than the rib diameter) for internal reinforcement, or an external fiberglass sleeve
-
For Aluminum Ribs:
- Strong epoxy adhesive (metal-specific)
- Aluminum mending plate or sleeve (a piece of slightly larger aluminum tubing)
- Small stainless steel bolts/nuts or rivets (with a rivet gun)
Step-by-Step DIY Repair Methods for Snapped Ribs
Repairing a snapped rib is a detailed process that requires precision. Always prioritize safety by wearing appropriate protective gear.
Method 1: Repairing Wooden Ribs
Wooden ribs, when snapped, often require a splice or a strong external brace.
- Prepare the Break: If the wood is splintered, carefully trim away loose pieces with a utility knife to create clean edges. If it’s a clean snap, ensure the two pieces fit together without gaps.
- Reinforce with a Splice (Recommended for clean snaps):
- Cut two pieces of matching wood, each about 6-8 inches long, that are the same width and thickness as the broken rib.
- Carefully sand the broken ends of the rib and one side of each splice piece.
- Apply wood glue generously to both broken ends and to one side of each splice piece.
- Position one splice piece on top of the broken rib, overlapping the break by an equal amount on both sides. Place the second splice piece on the bottom of the rib, mirroring the first.
- Clamp the entire assembly firmly, ensuring the rib is straight. Wipe away any excess glue.
- Allow the glue to dry completely according to the manufacturer’s instructions (usually 24 hours).
- Once dry, drill pilot holes through the splice pieces and the rib, then secure with small wood screws or bolts.
- Use a Metal Mending Plate (Alternative for splinters or smaller breaks):
- Align the broken wooden pieces as perfectly as possible.
- Select a flat metal mending plate or a U-shaped metal bracket that spans the break by at least 3 inches on each side.
- Apply wood glue to the broken ends and clamp them.
- Once dry, position the mending plate over the break. Drill pilot holes and secure the plate with small wood screws.
- Finish: Sand the repaired area smooth. Apply wood filler if needed for gaps. Stain or paint to match the umbrella’s original finish.
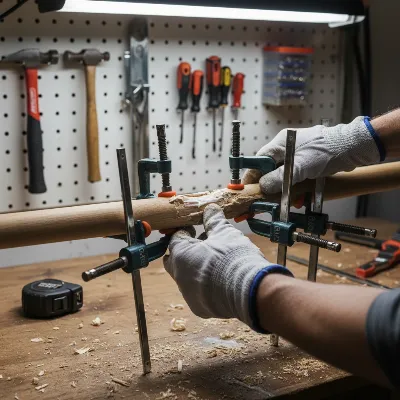 Close-up of a person repairing a snapped wooden patio umbrella rib with wood glue and clamps, showing detailed craftsmanship.
Method 2: Fixing Fiberglass Ribs
Fiberglass ribs often benefit from internal reinforcement or a fiberglass patch kit.
- Clean the Area: Thoroughly clean the broken ends of the fiberglass rib to remove dirt, grease, and loose fibers. Use rubbing alcohol for best results.
- Internal Reinforcement (Recommended for clean snaps):
- Find a piece of strong, lightweight material like a solid fiberglass rod, a carbon fiber rod, or a metal tube that fits snugly inside the hollow core of the snapped rib. It should be long enough to span the break by at least 4-6 inches on each side.
- Mix a strong, waterproof epoxy adhesive according to instructions.
- Apply epoxy to one end of the internal rod/tube and insert it into one half of the broken rib.
- Apply epoxy to the other end of the rod/tube and to the broken faces of the rib.
- Carefully align and push the two broken rib pieces together over the internal reinforcement.
- Wrap the exterior of the repaired section tightly with fiberglass repair tape or electrical tape to hold it in place while the epoxy cures.
- External Fiberglass Repair Kit (Good for splinters or external damage):
- Roughly sand the area around the break (about 2 inches on each side) to create a surface for the resin to adhere to.
- Mix the resin and hardener from the fiberglass repair kit.
- Apply a thin layer of resin to the sanded area.
- Cut pieces of fiberglass cloth (included in the kit) to wrap around the broken section. Build up several layers, applying resin between each layer. Ensure the wrap extends well beyond the break.
- Smooth out any air bubbles and ensure a consistent coating.
- Allow the repair to cure completely in a well-ventilated area, following the kit’s instructions.
- Finish: Once cured, gently sand the repaired area smooth. You can paint it to match the existing rib color, though fiberglass repairs are often left as is.
Method 3: Mending Metal (Aluminum) Ribs
Aluminum ribs can often be mended with a sturdy external sleeve or plate.
- Straighten (if bent): If the rib is merely bent rather than snapped, try to carefully straighten it using pliers or clamps. Be gentle to avoid creating new weak points.
- Clean the Break: Clean the area thoroughly with a degreaser or rubbing alcohol.
- External Sleeve/Plate Reinforcement (Recommended for snaps):
- Obtain a piece of aluminum tubing or a U-shaped channel that is slightly larger in diameter/width than the broken rib, and long enough to span the break by at least 4-6 inches on each side.
- Apply a strong, metal-specific epoxy adhesive to the broken ends of the rib and the inside of the sleeve/channel.
- Slide the sleeve over the broken rib, ensuring the rib pieces are perfectly aligned and straight.
- Clamp the assembly firmly while the epoxy cures.
- Once cured, drill two small pilot holes through the sleeve and the rib on each side of the break (four holes total).
- Secure the sleeve using small stainless steel bolts with nuts, or aluminum rivets if you have a rivet gun. This mechanical fastener provides crucial strength beyond just the epoxy.
- Finish: Sand any rough edges. You can paint the repaired section to match the umbrella’s frame if desired.
General Finishing Touches
After any repair, always perform a final check. Ensure the rib is straight, secure, and moves freely (if applicable). Test the umbrella by opening and closing it several times to confirm the repair holds under normal operation. For wooden or metal repairs, a coat of weather-resistant paint or sealant can protect the repair and improve aesthetics.
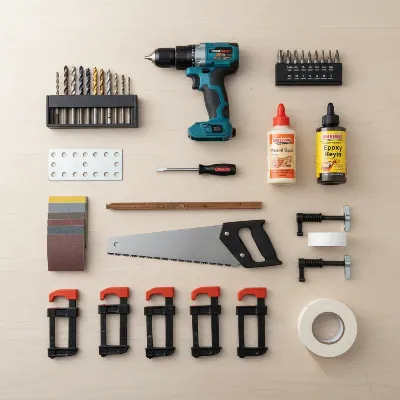 A collection of tools and materials for repairing a patio umbrella rib laid out on a clean surface.
When to Consider Professional Repair or Replacement
While many snapped ribs can be fixed at home, there are situations where a DIY repair might not be the best solution.
Consider professional repair or full umbrella replacement if:
- Multiple Ribs are Damaged: Repairing several ribs can be time-consuming and costly, potentially exceeding the value of a new umbrella.
- Structural Damage to the Hub or Pole: If the main pole, tilt mechanism, or the hub where the ribs attach is damaged, it might be beyond a simple rib repair.
- Extensive Canopy Damage: A severely torn or damaged canopy often necessitates replacement, as professional canopy repair can be expensive.
- Cost-Effectiveness: Compare the cost of repair materials and your time against the price of a new umbrella. For older, inexpensive umbrellas, replacement might be more practical.
Preventing Future Rib Damage
Taking proactive steps can significantly reduce the risk of future rib damage and prolong your umbrella’s life.
- Close and Secure Properly: Always close your patio umbrella when not in use, especially during windy conditions or when expecting a storm. Use a tie strap or cover to secure the canopy tightly.
- Use a Heavy Base: Ensure your umbrella has a sufficiently heavy and stable base to prevent it from toppling over in gusts of wind.
- Regular Maintenance and Inspection: Periodically check all ribs, joints, and the canopy for signs of wear, loose screws, or small cracks. Address minor issues before they become major breaks.
- Choose Durable Models: If buying a new umbrella, consider models with fiberglass ribs or reinforced aluminum frames, as they tend to be more resilient against wind.
“A well-maintained patio umbrella can last for years, but even the best designs can succumb to nature’s elements. Learning to repair common issues like a snapped rib empowers you to keep enjoying your outdoor space without constant replacements.” – Sarah Jenkins, Outdoor Living Specialist
Conclusion
A snapped rib on your patio umbrella doesn’t have to be the end of its life. With the right tools, materials, and a bit of DIY spirit, you can successfully mend the damage, restore its functionality, and extend its usefulness. By understanding your umbrella’s construction, carefully assessing the break, and following the appropriate repair method for wood, fiberglass, or aluminum ribs, you can bring your beloved shade provider back from the brink. Remember to practice preventive measures to protect your umbrella from future damage, ensuring many more seasons of outdoor enjoyment. What kind of rib material does your Patio Umbrella have, and which repair method sounds most suitable for your situation?
Frequently Asked Questions
Can I use duct tape for a quick fix on a snapped rib?
While duct tape might offer a very temporary and aesthetic fix, it will not provide the structural integrity needed for a snapped rib, especially in windy conditions. For a lasting repair, it’s essential to use appropriate materials like wood glue, epoxy, or metal splints.
How long does a DIY rib repair typically last?
A well-executed DIY repair, using the correct materials and techniques, can last for several years, often as long as the original undamaged ribs. Its longevity depends on the quality of the repair, the materials used, and how well the umbrella is cared for afterward.
What if my umbrella’s fabric is also torn near the snapped rib?
If the fabric is torn, you can often patch it with a heavy-duty outdoor fabric repair kit or sail repair tape. For larger tears or if the tear compromises the structural integrity of the canopy, a professional upholstery or sail repair shop might be able to help, or it might be time to consider a canopy replacement.