A broken string on your patio umbrella can quickly turn a sunny afternoon into a frustrating ordeal, leaving you without the shade you need. Instead of discarding your beloved outdoor essential, a simple DIY fix can often restore its full functionality. This comprehensive guide will walk you through every step of repairing a broken patio umbrella string, ensuring your outdoor space remains comfortable and inviting.
Understanding Your Patio Umbrella’s Mechanism and String
Before diving into repairs, it’s crucial to understand how your patio umbrella operates and the components involved, especially the string. This knowledge demystifies the repair process and helps prevent future issues.
Common Patio Umbrella String Types
|
Our Picks for the Best Patio Umbrella in 2026
As an Amazon Associate I earn from qualifying purchases.
|
||
| Num | Product | Action |
|---|---|---|
| 1 | ABCCANOPY 9ft Outdoor Umbrella Replacement Top Suit 8 Ribs (Turquoise) |

|
| 2 | MASTERCANOPY Patio Umbrella 9 ft Replacement Canopy for 8 Ribs-Burgundy Canopy Only |
|
| 3 | JEAREY 9 FT Patio Umbrella Outdoor, Table Umbrellas Market Umbrella w/Push Button Tilt/Crank, 8 Sturdy Ribs(Cerulean) |
|
| 4 | JEAREY 7.5FT Patio Umbrella Outdoor Market Umbrella with 6 Sturdy Ribs, Push Button Tilt/Crank Table Umbrella for Garden, Deck, Backyard and Pool, Royal Blue |
|
| 5 | Kingdura 9ft 3-Tier Patio Umbrella, Outdoor Table Umbrella with Easy Crank & Tilt, 8 Reinforced Ribs, UV Protection for Deck, Pool, Market, Backyard (Beige) |
|
| 6 | 9ft Patio Umbrella with Push Button Tilt and Crank,Outdoor Market Table Umbrella UV Protection 8 Sturdy Ribs for Backyard,Garden,Pool,Deck |
|
| 7 | ABCCANOPY 7.5ft Scalloped Patio Umbrella, Outdoor Table Umbrella with Tilt and Crank, Fiberglass Ribs Deck Umbrella for Patio, Pool, Garden, Picnic (Turquoise) |
|
| 8 | AreShark 9FT Patio Umbrella with Solar Lights, 32 LED Lighted Pool Umbrella w/Tilt and Crank, Outdoor Market Solar Umbrellas for Garden, Deck, Backyard, Pool and Beach, Light Gray |
|
| 9 | BACKYARD EXPRESSIONS PATIO · HOME · GARDEN 911554 21 Pound Umbrella Base, Bronze |
|
| 10 | 9FT Auto-Tilt Patio Umbrella|Outdoor Market Table Umbrella with 8 Fiberglass Ribs for Pool,Deck&Backyard |
|
Most patio umbrellas utilize a strong, durable cord to facilitate their opening and closing mechanism. These strings are typically made from materials designed to withstand outdoor conditions and constant tension. Polyester and braided nylon are the most common types due to their strength, resistance to UV degradation, and ability to glide smoothly through pulleys. The specific type and thickness of the string will depend on your umbrella’s design, with thicker cords generally indicating a more robust lifting system. When selecting a replacement, aim for a similar material and diameter to ensure compatibility and durability.
How a Patio Umbrella Mechanism Works
The core of a patio umbrella’s operation lies in its internal lifting mechanism. For crank-operated umbrellas, a string (or rope) is threaded through a series of pulleys located at the top hub and often along the central pole. This string is connected to the canopy’s central runner (or yoke) and then extends down to a crank assembly at the base of the pole. When you turn the crank, it winds or unwinds the string, causing the runner to move up or down, thereby opening or closing the umbrella canopy. Pulley systems reduce the force required, making it easy to operate even large umbrellas.
Why Umbrella Strings Break
Umbrella strings are constantly under stress, making them prone to breakage over time. Several factors contribute to their wear and tear:
- Friction: Continuous movement against pulleys and internal components causes fraying and weakening of the string.
- UV Exposure: Sunlight’s ultraviolet rays can degrade the string material, making it brittle and less resilient.
- Over-cranking: Applying excessive force when opening or closing the umbrella can over-stress the string, leading to snapping.
- Material Fatigue: Like any material, the string has a lifespan and will eventually succumb to material fatigue.
- Poor Maintenance: Lack of lubrication or cleaning can increase friction, accelerating string wear.
Understanding these causes can help you take preventative measures to extend the life of your umbrella.
Essential Tools and Materials for String Repair
Successfully fixing a broken patio umbrella string requires a few basic tools and the correct replacement materials. Having everything ready beforehand will streamline the repair process.
What You’ll Need
Gathering these items will ensure a smooth repair:
- Replacement String: A new, strong cord of similar diameter and material (braided nylon or polyester) to the original. Measure the length of your umbrella’s pole and canopy extension to estimate the required length; it’s always better to have more than less.
- Philips Head Screwdriver: For disassembling the crank housing.
- Flat Head Screwdriver: Potentially useful for prying or adjusting.
- Needle-Nose Pliers: Essential for removing cotter pins, gripping small components, and threading the new string.
- Wire Coat Hanger or Flexible Wire/Grabber Tool: Crucial for guiding the new string through the hollow pole and tight spaces.
- Lighter or Matches: To melt and seal the ends of the new string, preventing fraying.
- Scissors or Utility Knife: For cutting the old and new string.
- Safety Glasses and Gloves: For protection during the repair.
Choosing the Right Replacement String
The quality and type of your replacement string are paramount for a durable repair.
- Material: Opt for braided nylon or polyester rope. These materials are known for their strength, low stretch, and resistance to abrasion and weather. Avoid cotton or natural fibers, which can rot and degrade quickly outdoors.
- Diameter: The new string should match the diameter of the original as closely as possible. If it’s too thick, it won’t fit through the pulleys; if it’s too thin, it might fray faster or slip.
- Length: A good rule of thumb is to measure the height of your umbrella pole and multiply it by two, then add a few extra feet to account for the canopy’s travel and knotting. For large umbrellas, 15-20 feet of string is often sufficient.
Step-by-Step Guide to Fixing a Broken Patio Umbrella String
Repairing a broken patio umbrella string can seem daunting, but by following these detailed steps, you can restore your umbrella’s functionality with confidence.
Safety First: Preparing Your Umbrella
Before any disassembly, ensure your work area is safe and secure.
- Lower the Umbrella: If possible, lower the umbrella canopy completely. If the string is broken, you might need to manually push the canopy down.
- Remove from Base: Carefully lift the umbrella pole out of its base and lay it horizontally on a clean, stable surface, such as a workbench or large table. This provides better access to the components and prevents accidental damage.
- Remove the Canopy (Optional but Recommended): While not always strictly necessary, removing the fabric canopy from the umbrella frame can make the threading process significantly easier. Typically, this involves unscrewing the finial at the top and carefully detaching the canopy from the ribs.
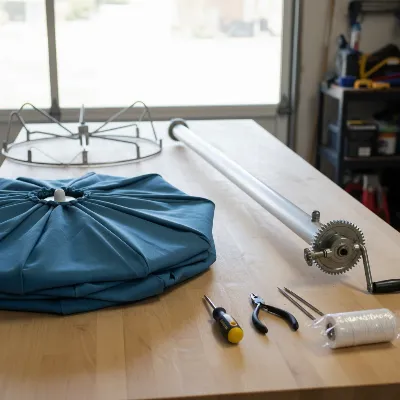 A patio umbrella pole laid horizontally with tools for repair, showing a detached canopy and the crank mechanism.
Removing the Old String and Canopy
This step involves careful disassembly to access the broken string and prepare for the new one.
- Access the Crank Housing: Locate the crank housing at the bottom of the umbrella pole. Use your Philips head screwdriver to remove the screws that secure it in place. Carefully open the housing to expose the internal crank mechanism.
- Disassemble Crank Components: Inside the housing, you’ll typically find a cotter pin, a nut, a plastic cog, and a washer. Use needle-nose pliers to remove the cotter pin, then unscrew the nut. Carefully remove the cog and washer, keeping them together and noting their order for easier reassembly.
- Remove the Crank Handle: The crank handle usually attaches to a shaft. Apply a little force to pull the crank handle off the shaft. You may also need to pop a rivet off the side of the umbrella shaft that secures the support brace.
- Remove the Old String: With the crank mechanism largely disassembled, you should be able to see where the old string was attached and how it was routed. Untie any knots and carefully pull out the remnants of the broken string from the crank axle hole and the rest of the pole. Pay close attention to the path it took, especially through the top hub pulleys.
Rerouting the New String Through the Mechanism
This is often the trickiest part, requiring patience and a guiding tool.
- Prepare the New String: Cut the new string to the estimated length. Use a lighter or match to carefully melt and fuse both ends of the string. This prevents fraying and makes threading much easier.
- Thread Through the Top: Start by threading one end of the new string through the lift ring (yoke) that holds the umbrella canopy in place. Tie a secure double knot to attach it firmly to the lift ring.
- Route Through Pulleys: Guide the string upwards, through the pulley system at the top hub of the umbrella. Ensure it sits correctly in all grooves.
- Down the Pole: This is where the wire coat hanger or grabber tool becomes invaluable. Straighten out a wire coat hanger and bend one end into a small hook. Securely attach the free end of your new string to this hook with needle-nose pliers, or tape it firmly.
- Guide Through the Pole: Insert the hooked end of the hanger (with the string attached) into the top of the hollow umbrella pole. Carefully push it down, wiggling and manipulating the hanger until it emerges from the crank access hole near the bottom of the pole.
- Pull Through and Detach: Once the hanger and string emerge, use your needle-nose pliers to grab the string, pull it completely out, and then detach it from the hanger.
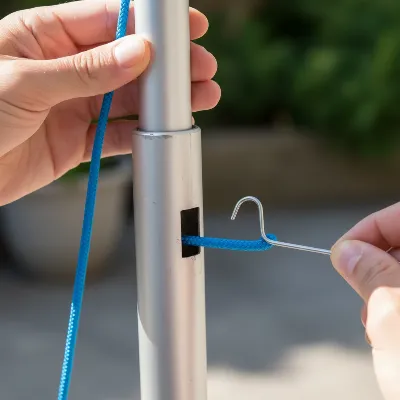 A close-up view of hands using a wire hanger to rethread a new patio umbrella string through the hollow pole.
Securing and Testing the New String
With the string routed, it’s time to reassemble and test.
- Thread Through Crank Axle: Feed the free end of the new string through the center hole of the crank axle.
- Tie a Secure Knot: Make a tight double knot at the end of the string to prevent it from pulling back through the axle. Ensure the knot is firm and will not unravel under tension.
- Reassemble Crank Mechanism: Reverse the disassembly steps. Place the plastic cog and washer back onto the shaft in the correct order, then reinsert the nut and secure it with the cotter pin using your needle-nose pliers. Reattach the crank handle firmly.
- Re-secure Housing: Close the crank housing and screw it back into place with the Philips head screwdriver.
- Reattach Canopy: If you removed the canopy, reattach it to the frame and screw the finial back on securely.
- Test the Operation: Stand the umbrella upright and place it back into its base. Slowly turn the crank handle to open and close the umbrella. Observe the string’s movement, ensuring it glides smoothly through the pulleys and the canopy opens and closes without obstruction. Adjust the string tension if necessary by slightly untying and re-tying the knot at the crank axle if the umbrella isn’t opening fully or closing tightly.
Common Challenges and Troubleshooting Tips
Even with a detailed guide, you might encounter a few snags during the repair. Here’s how to tackle common issues.
String Getting Stuck
A common frustration is the string getting caught inside the pole or mechanism.
- Use the Guiding Tool: If the string gets stuck while threading, gently pull back the wire hanger or grabber tool and try again. Sometimes, a slight rotation of the pole can help clear an obstruction.
- Check for Internal Debris: Before rethreading, use a flashlight to look inside the pole for any old string fragments, rust, or debris that might be causing a blockage. A vacuum cleaner or a long brush can help clear these out.
- Smooth the Path: Ensure the ends of your new string are properly melted and sealed to prevent them from fraying and snagging.
Tension Issues
Incorrect string tension can lead to an umbrella that doesn’t open fully or struggles to stay open.
- Too Loose: If the umbrella doesn’t fully open, the string might be too loose. Untie the knot at the crank axle, pull a little more string through, and re-tie a tighter knot. Test again.
- Too Tight: If the umbrella is difficult to crank or feels strained, the string might be too tight. Slightly loosen the knot at the crank axle, allowing a bit more slack, and re-tie.
- Lubrication: Occasionally, the issue isn’t the string’s tension but friction in the pulleys or crank. Apply a silicone-based lubricant to the pulleys and the crank mechanism to ensure smooth operation. Avoid oil-based lubricants as they can attract dirt.
When to Call a Professional
While most string repairs are DIY-friendly, there are instances when professional help is advisable:
- Complex Mechanisms: Some high-end or older umbrellas may have very intricate internal mechanisms that are difficult to disassemble and reassemble without specialized knowledge.
- Damaged Internal Components: If you discover that not just the string but also the pulleys, gears, or other vital internal components are broken, a professional might be better equipped to source and replace these parts.
- Lack of Time or Confidence: If you’re short on time or simply not comfortable with the repair process, a professional outdoor furniture repair service can quickly handle the job, ensuring it’s done correctly.
“A broken string doesn’t mean the end for your patio umbrella. With a bit of patience and the right approach, a DIY repair can extend its life significantly, saving you money and hassle.” – Alex Chen, Outdoor Furniture Repair Specialist
Preventing Future String Breakage
Proactive care is key to extending the life of your patio umbrella string and avoiding repeat repairs. Simple habits can make a big difference.
Regular Maintenance Practices
Consistent maintenance can dramatically reduce wear and tear on your umbrella’s string and mechanism.
- Inspect Regularly: Periodically check the string for signs of fraying, thinning, or discoloration, especially near the pulleys and crank. Early detection allows for timely, minor adjustments before a full break occurs.
- Clean the Mechanism: Dirt, dust, and debris can accumulate in the crank housing and pulleys, increasing friction. Use a soft brush and a mild cleaning solution to keep these areas clean.
- Lubricate Moving Parts: Apply a dry, silicone-based lubricant to the pulleys and crank mechanism once or twice a year. This reduces friction and ensures smooth operation without attracting grime.
- Tighten Screws: Periodically check and tighten any loose screws on the crank housing or frame, as these can affect the alignment and put undue stress on the string.
Proper Usage Techniques
How you operate your patio umbrella directly impacts the longevity of its string.
- Avoid Over-Cranking: Never force the crank when opening or closing the umbrella. If it feels stiff, check for obstructions or apply lubricant. Over-cranking puts excessive strain on the string, leading to breakage.
- Gentle Operation: Open and close the umbrella smoothly and gradually. Jerky movements can cause the string to slip or snap.
- Do Not Leave Open in High Winds: Strong winds are a primary cause of damage to patio umbrellas, including snapping strings and breaking ribs. Always close and secure your umbrella when windy conditions are expected.
Protecting Your Umbrella from Elements
Environmental factors play a significant role in the degradation of umbrella strings and fabric.
- Use an Umbrella Cover: When not in use, especially during off-seasons or extended periods, invest in a good-quality patio umbrella cover. This protects the fabric and internal components, including the string, from UV rays, rain, and debris.
- Store Indoors: For severe weather or winter months, consider storing your umbrella indoors or in a sheltered area. This completely shields it from harsh elements that accelerate material degradation.
- Clean Before Storage: Before storing, ensure the umbrella is clean and completely dry to prevent mold and mildew growth, which can also affect string integrity.
Comparing Different String Repair Approaches
Deciding whether to tackle the repair yourself, hire a professional, or simply replace the umbrella depends on several factors. Here’s a comparison to help you choose.
Table of String Repair Options
| Feature | DIY Repair (Patio Umbrella String) | Professional Repair | Replacing the Umbrella |
|---|---|---|---|
| Cost | Low (cost of string, basic tools) | Moderate to High (labor, parts) | High (new umbrella purchase) |
| Effort | Moderate (requires patience & time) | Low (drop off/pickup) | Low (selection, delivery/assembly) |
| Skill Required | Basic mechanical aptitude, patience | Expert knowledge, specialized tools | None |
| Timeframe | A few hours to a half-day | Days to weeks (depending on service) | Immediate to a few days |
| Durability | Good (if done correctly with quality string) | Excellent (professional quality) | New product warranty |
| Convenience | Low (DIY effort) | High (hands-off) | High (fresh start) |
| Best For | Minor string breaks, budget-conscious | Complex issues, time-sensitive, valuable umbrellas | Extensive damage, desire for upgrade |
Conclusion
A broken string on your patio umbrella doesn’t have to signal the end of its useful life. By understanding the simple mechanics and following a clear, step-by-step repair guide, you can quickly restore your Patio Umbrella to full functionality. From carefully disassembling the crank housing and precisely rethreading the new string to reassembling the components, this DIY fix is achievable for most homeowners. Regular maintenance, such as routine inspections and proper usage, will further extend the lifespan of your umbrella, ensuring countless seasons of comfortable outdoor living. Don’t let a snapped string keep you from enjoying your outdoor sanctuary—take action and enjoy the shade once more. What minor repair has given new life to your favorite outdoor item?
Frequently Asked Questions
Can I use any type of rope to fix my patio umbrella string?
No, it’s best to use a strong, durable synthetic cord like braided nylon or polyester, which resists UV rays and abrasion. Avoid natural fibers that can degrade quickly outdoors.
How do I know what length of string I need for my patio umbrella?
A good estimate is to measure the height of your umbrella pole and multiply it by two, then add an additional 2-3 feet for extra length, knotting, and maneuvering during the repair.
What if the string keeps getting stuck when I try to thread it through the pole?
Try using a straightened wire coat hanger or a flexible grabber tool to guide the string. Ensure the string’s end is melted and sealed to prevent fraying and snagging. Checking for internal debris with a flashlight can also help.
Is it possible to repair a broken umbrella rib at the same time as the string?
Yes, minor rib repairs can often be done with splints, strong adhesive ties, or small hardware. Many DIY guides cover both string and rib repairs, making it efficient to fix multiple issues at once.
How often should I perform maintenance on my patio umbrella to prevent string breakage?
Regularly inspect your umbrella’s string for wear signs at least once or twice a year, especially before and after the peak usage season. Clean the mechanism and apply silicone lubricant annually to reduce friction.